
Layout
The layout is very simple. I laid down a sphere and scaled it up. Added a camera, made it a wide focal length (18mm). I made a simple animation to translate and rotate the camera around part of the sphere.

Camera path
You can see how the wide angle of the 18mm really stretches the sides of the sphere. It allows for a fully immersive experience, and I use it in my 3D work the same way I use it in my photography. I primarily shoot at 24mm focal length with the GM f/1.4, and some of my favorite shots are captured with the wider field of view. But I digress.
Line Creation
Let's talk lines!

Default curl noise function

Project onto a tangent plane
First we're sampling the points on the surface of the sphere and performing a curl noise function inside a point VOP.
You can see how the default curl noise ignores any Normal information of the sphere, whereas we'd like the noise to follow the surface of the geometry.
So how do we do that?
Simple, we just drop a point wrangle down after the point VOP and write some code:
v@v = v@v - v@N * dot(v@v, v@N);
What this allows us to do is project these velocity lines onto a plane tangent to the surface of the sphere. Thus allowing for lines that travel along the surface of the geometry, while still being all curl-noisy and all. Pretty cool.
Now we need to sample some points near the sphere. These will act as our advection sources - basically where our velocity lines will start. In this example, I used a point replicate node to make some points in a noisy area around the sphere, and then culled most of the points with a noise. Let's take a look at this in more detail.

We use our sphere as an input to the point replicate, and simply pass a noise through it. You can play around with the point replicate to scale the points slightly, because it's nice to have them offset from the surface. Every little bit of randomness helps sell a shot.
I'm using a blast node and setting the expression @rmv=0, which kills any noise that has a value of zero. I'll point out we're saving the noise as rmv.
Scatter points randomly around sphere
Next we take the output of the point wrangle (with the velocity attribute created) and pass that through to a VDB from Polygons SOP. Uncheck "Distance VDB" since we don't care about any of that SDF nonsense.
At the bottom, we want to pass in a "Surface Attribute" and set it to "point.v", change the name to "vel" and set the "Vector Type" to "Displacement/Velocity/Acceleration".
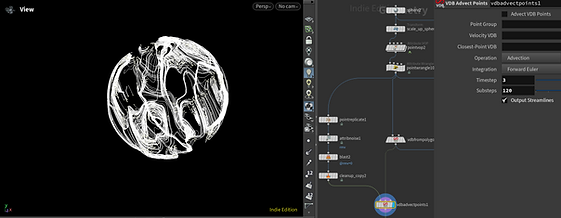
Next we simply advect those points through the velocity volume using a VDB Advect Points SOP. The defaults are bit strange, so make sure to break the expression on "Timestamp" and set the value to 3, and set the substeps to 120.
Now you can see nice velocity trails, and it's fast :)

Convert to VDB velocity volume

Advect the points
Making Them Move
So how do we make them actually move? Well just two simple steps:
-
first we use noise
-
second we "carve" the lines, but there's a secret vex function we'll use instead of the carve SOP because it's faster!

What we'll create
The first step is passing a noise through the lines. They'll look a little strange and jagged, and that's because they'll need to be resampled with subdiv curves to smooth them out.
But before we do, it's a good idea to jump to /obj level and make sure Shade Open Curves in Viewport is enabled on the geometry container. I learned this trick while on the Across the Spider Verse film, and it allows us to visualize a width parameter so we don't have to extrude geometry.

Shading open curves in viewport
Pay attention on where to find it - it's on the Misc tab of the geometry container. It's an easy parameter to miss, and I'll admit I went years without knowing if its existence. Previously I would always add a Polywire or some form of surface extrusion along the curves. However in cases like this where we draw lots of curves in the viewport, turning them into geometry is a bad idea. So it's best to leverage this trick and make our GPU happier, which makes us happier. A happy GPU is a happy VFX artist.
TIP!

Subdiv lines from resample
The noise is a Mountain SOP that doesn't change the shape a whole lot. It just adds that secondary movement to help make the lines feel more alive.
Once we add that, we compute the velocity with a Trail SOP, just so we can render motion correctly. I do want to point out I use a Clean SOP to prune any unwanted points (stragglers if you will) because they will ultimately be rendered as giant spheres if we don't take of them now.
Finally resample. In my case I used a length of 0.002, ensure to store Curve U Attribute, and Treat Polygons as Subdivision Curves. That's all.
Make sure to set a width attribute, I use a point wrangle here. My VEX code is as follows: @width=fit01(rand(@primnum, 0), 0.01, 0.1)*.2 * chf('scale');
The scale attribute I set to 0.056, of course this will need to change based on your scene and preferences. I also set an Id attribute that's unique to each line (or @primnum). Since the lines at this point aren't changing point count, we can set the id to: i@id = @primnum.
Then I promote it to primitives with an Attribute Promote node, and voila. We're ready to animate these suckers.
Animation
Now that everything's setup, let's start carving these lines up. The idea is simple - each line will have a start and end frame, and they'll simply carve along the length of each curve between those values based on the current frame.
So what that looks like is this:

A single line carved

Multiple line carve
It's simple enough to carve a single line. We can even keyframe the U parameter from 0-1 and we get this.
But what if we have multiple curves? Well they all are animated at the same time, as seen on the right. So what's the next logical step? Probably a for-each loop, where we loop through each line and carve individually - based on that start and end frames we are creating.
First of all let's create those attributes:
i@startframe = fit01(rand(@primnum, 3), 1001, 1090);
if (rand(@primnum,34) > .9)
i@startframe -= 200;
i@endframe = i@startframe + fit01(rand(@primnum, 44), 100, 330);
This will randomly create a startframe between frame 1001 to 1090, with 10% having a start frame well before 1001. The endframe will then be whatever the startframe is + a random value between 100 to 330.

For-each loop

For-each loop network
But this method is SLOW. And in Houdini we're all about optimizing our workflow because we often work on very expensive projects, and the client is waiting. I'm not going to talk about the expressions above, if you're interested you can look at them and see what's happening for yourself. I'm more interested in how to speed up this process.
Instead of a for-each loop, let's drop down a Measure SOP to measure the perimeter (really length) of each line like this:

Measure SOP to calculate perimeter
Lastly we simply run a couple lines of VEX to smoothly blend between the start and end frame. A simple fit function returns a linear interpolation between two values. We want to smoothly interpolate, so let's take a look at how to accomplish this in more detail.
On the example to the right, we can see the two types of interpolation in action. The top is obviously Linear and the bottom Smooth. What do these look like in code? Let's have a look.
All we're doing is adding to the X component of the Position vector, fitting the current frame (@Frame) between 1001 and 1024 to a value of 0 to 2.
So that means on frame 1001, the value is 0, and on frame 1024 the value is 2.
This is super helpful because we can now animate in code without having to set any keyframes. However, the limitation being that this will do a linear interpolation.

Linear interpolation VEX

Interpolation method

Smooth interpolation VEX
So instead of a simple fit function, we combine it with a smooth function as seen above to the right. The smooth function takes three values: a starting value, an ending value, and a bias value. It returns a smooth value between 0 and 1. So we can use a fit01 expression and wrap that around the smooth function, since we want our value to go from 0 to 2 smoothly.

VEX carve
Okay let's carve it with VEX. First we use a primitive wrangle and ensure we write: #include <groom.h> at the top. This will give us access to the adjustPrimLength function, which is the core function of this entire exercise.
We're first grabbing the startframe and endframe attributes from the point, and using the nifty fit01(smooth()) trick we just learned to smoothly blend between the start and end frames, but for each line individually without a for-each loop :)
Lastly we use adjustPrimLength to carve them. Voila!
Leading the Trails
Alright now we just need a way to extract the leading edge of each animated line. All we do is reuse that nifty resample node and make a new curveu attribute, renaming it to whatever suits us. In my case I use farm animals, so I call it @pig - I stole the farm animal idea from Garman Herigstad.

Leading the trails
Now that we have the new curveu (or pig) attribute calculated, we can prune them except for the end. Remember @curveu is returning 0-1 along the length of each curve.
if (@pig!=1) removepoint(0, @ptnum, 2);
I put that into a point wrangle, copy some spheres to those points and that's all.
Now it's time to render this.
Compositing
The compositing for this was done in Nuke, and it was fairly straightforward. I'm not going to write much about it other than the Bokeh node is instrumental in achieving that "filmic" look.

Normal Pass
To the left, the N AOV pass from Houdini. I ended up not using it, but it's a good idea to always write it out in your multi-pass exr because it could be useful to extract normal information in comp.
I wrote out some more AOVs, such as a random_id pass that varied each line from 0-1, so I could grade lines with variation, instead of using a procedural noise in Nuke. The rest was glows, bokeh, and some filmic treatments to fine-tune it to what I was after.

Comp steps
The rest was DaVinci Resolve, adding things like Lens Flare and more filmic effects. I hope you learned something new here :)